Apex is a strongly typed, object-oriented programming language that you use to execute code in your Saleforce instance. The Apex syntax is similar to Java and also includes built-in support for database operations. In this module, you create an EmailManager class that encapsulates the logic to send confirmation emails to the conference speakers.
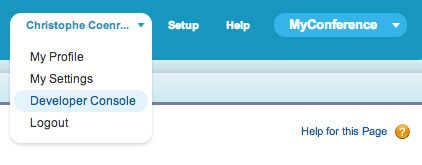
In Salesforce, click your name in the upper right corner of the screen. In the dropdown menu, click Developer Console.
In the Developer Console, click File > New > Apex Class. Specify EmailManager as the class name and click OK
Implement the class as follows:
public class EmailManager {

    public static void sendMail(String address, String subject, String body) {
        Messaging.SingleEmailMessage mail = new Messaging.SingleEmailMessage();
        String[] toAddresses = new String[] {address};
        mail.setToAddresses(toAddresses);
        mail.setSubject(subject);
        mail.setPlainTextBody(body);
        Messaging.sendEmail(new Messaging.SingleEmailMessage[] { mail });
    }

}
Click File > Save to save the file
In this module, you test the EmailManager class by sending an email from the developer console. Later in this workshop, you'll integrate the EmailManager class with other parts of the application to automate the process of sending confirmation emails.
In the Developer Console, click Debug > Open Execute Anonymous Window
Type the following Apex code (provide your own email address):
String address = 'YOUR_EMAIL_ADDRESS';
String subject = 'Speaker Confirmation';
String body = 'Thank you for speaking at the conference.';
EmailManager.sendMail(address, subject, body);
Click the Execute button
Check your email: you should have received the confirmation email