Part 4: Creating the AccountLocator Component

In this module, you create the skeleton for the AccountLocator Lightning Component, and you test it in the Salesforce1 application.

What you will learn

  • Create a Lightning Component
  • Style a Lightning Component
  • Deploy a Lightning Component in the Salesforce1 application
  • Preview your Lightning Component in the Salesforce1 Application or the simulator

Step 1: Create the AccountLocator Component

  1. In the Developer Console, click File > New > Lightning Component. Specify AccountLocator as the bundle name and click Submit.

  2. Implement the component as follows:

    <aura:component implements="force:appHostable">
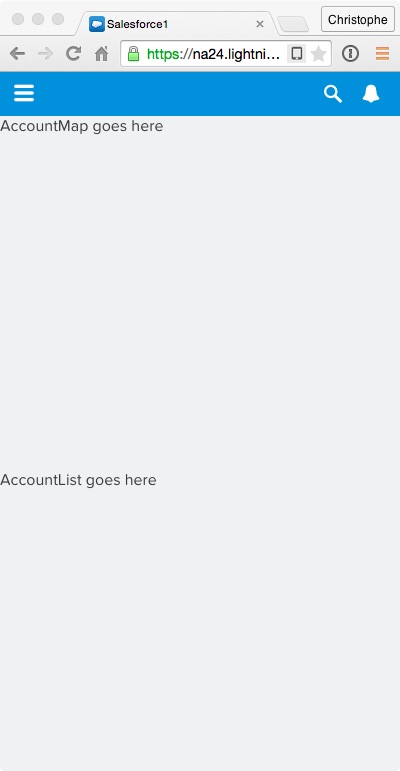
    
        <div>
            <div>AccountMap goes here</div>
            <div>AccountList goes here</div>
        </div>
    
    </aura:component>
    

    Code Highlights:

    • The component implements the force:appHostable interface to indicate that it can run in the Salesforce1 application.
    • Lightning components can include regular HTML markup and other Lightning components.
  3. Click STYLE (upper right corner), and implement the component style as follows:

    .THIS {
        position:absolute;
        height: 100%;
        width: 100%;
    }
    
    .THIS>div {
        height: 50%;
    }
    

    Code Highlights:

    • .THIS refers to the root level div tag.
    • .THIS>div refers to the divs that are immediate children of the root div. There are two of them in this component, and we split the component height evenly between them.
  4. Click File > Save to save the file.

Step 2: Create a Tab for the AccountLocator Component

  1. In Setup, click Create > Tabs.

  2. In the Lightning Component Tabs section, click New.

    • Select c:AccountLocator as the Lightning Component.
    • Specify Account Locator as the Tab Label and Account_Locator as the Tab Name.
    • Click the magnifier icon and select Map as the tab icon.
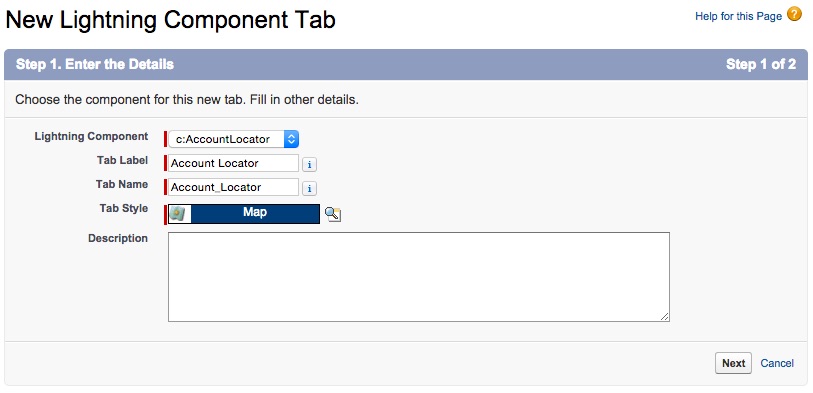
  3. Click Next and Save.

Step 3: Add the Tab to Mobile Navigation

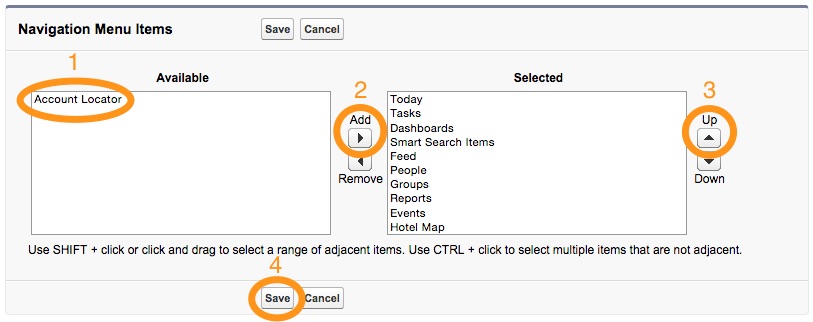
  1. In Setup, Select Administer > Mobile Administration > Mobile Navigation:

    • Select Account Locator in the Available list.
    • Click Add.
    • Select Account Locator in the Selected List, and click the Up button to move the tab up in the menu order.
    • Click Save.

Step 4: Preview the Component in the Salesforce1 Application

  1. In Salesforce, modify the URL as follows:

    • Remove the part of the URL that comes immediately after salesforce.com
    • Append /one/one.app to the URL immediately after salesforce.com

    This starts the Salesforce1 Application simulator.

  2. Click the menu button in the upper left corner.

  3. Select Account Locator in the menu.

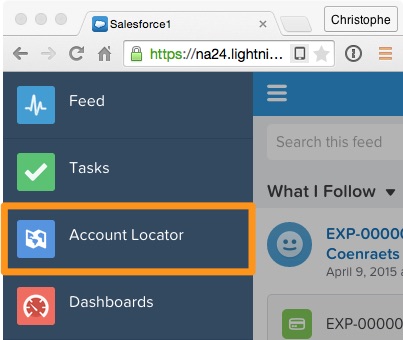
  4. Preview the component.