In this section, we add an employee details view. Since the application now has more than one view, we also add a simple view routing mechanism.
Open index.html and add a template to render a detailed employee view:
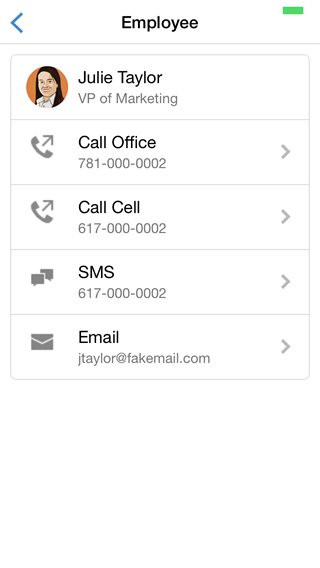
  <script id="employee-tpl" type="text/template">
      <header class="bar bar-nav">
          <a class="btn btn-link btn-nav pull-left" href="#">
              <span class="icon icon-left-nav"></span>
          </a>
          <h1 class="title">Employee</h1>
      </header>
      <div class="content">
          <div class="card">
              <ul class="table-view">
                  <li class="table-view-cell media">
                      <img class="media-object pull-left emp-pic" src="assets/pics/{{pic}}">
                      <div class="media-body">
                          {{ firstName }} {{ lastName }}
                          <p>{{ title }}</p>
                      </div>
                  </li>
                  <li class="table-view-cell media">
                      <a href="tel:{{ officePhone }}" class="push-right">
                          <span class="media-object pull-left icon icon-call"></span>
                          <div class="media-body">
                              Call Office
                              <p>{{ officePhone }}</p>
                          </div>
                      </a>
                  </li>
                  <li class="table-view-cell media">
                      <a href="tel:{{ cellPhone }}" class="push-right">
                          <span class="media-object pull-left icon icon-call"></span>
                          <div class="media-body">
                              Call Cell
                              <p>{{ cellPhone }}</p>
                          </div>
                      </a>
                  </li>
                  <li class="table-view-cell media">
                      <a href="sms:{{ cellPhone }}" class="push-right">
                          <span class="media-object pull-left icon icon-sms"></span>
                          <div class="media-body">
                              SMS
                              <p>{{ cellPhone }}</p>
                          </div>
                      </a>
                  </li>
                  <li class="table-view-cell media">
                      <a href="mailto:{{ email }}" class="push-right">
                          <span class="media-object pull-left icon icon-mail"></span>
                          <div class="media-body">
                              Email
                              <p>{{ email }}</p>
                          </div>
                      </a>
                  </li>

              </ul>
          </div>
      </div>
  </script>
Create a file named EmployeeView.js in the js directory, and define it as follows:
var EmployeeView = function(employee) {

  this.initialize = function() {
      this.$el = $('<div/>');
  };

  this.render = function() {
      this.$el.html(this.template(employee));
      return this;
  };

  this.initialize();

}
In index.html, add a script tag to include EmployeeView.js (just before the script tag for app.js):
<script src="js/EmployeeView.js"></script>
In index.html, add a script tag to include router.js (just after the script tag for jquery.js):
<script src="lib/router.js"></script>
Open app.js. Add the compiled employee template to the prototype of EmployeeView:
EmployeeView.prototype.template = Handlebars.compile($("#employee-tpl").html());
Define the two routes used in the application:
service.initialize().done(function () {
  router.addRoute('', function() {
      $('body').html(new HomeView(service).render().$el);
  });

  router.addRoute('employees/:id', function(id) {
      service.findById(parseInt(id)).done(function(employee) {
          $('body').html(new EmployeeView(employee).render().$el);
      });
  });

  router.start();
});
Test the application.