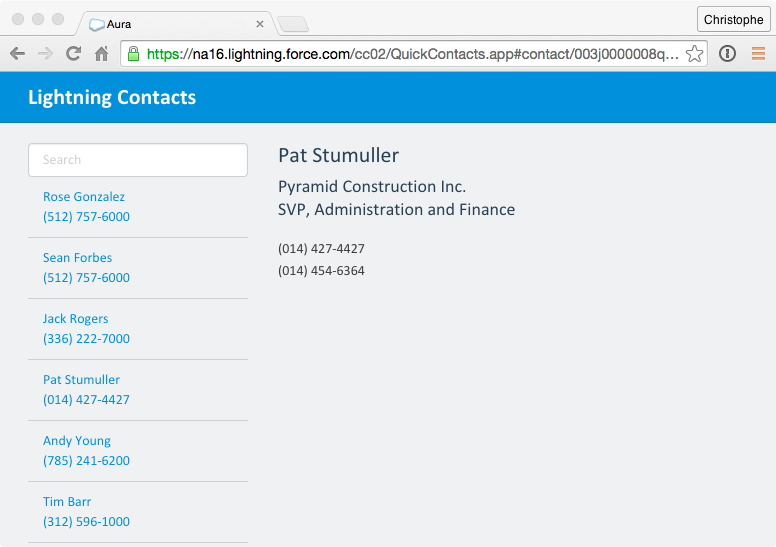
In this module, you create the ContactDetails component. When the user selects a contact in ContactList, ContactDetails automatically displays the details for the selected contact.
In the Developer Console, click File > New > Lightning Component. Specify ContactDetails as the bundle name and click Submit
Implement the component as follows:
<aura:component controller="yournamespace.ContactController">

    <aura:attribute name="contact" type="Contact" default="{'sobjectType': 'Contact'}"/>
    <aura:handler event="aura:locationChange" action="{!c.locationChange}"/>

    <div class="details">
        <h1>{!v.contact.Name}</h1>
        <h3>{!v.contact.Account.Name}</h3>
        <h3>{!v.contact.Title}</h3>
        <p>{!v.contact.Phone}</p>
        {!v.contact.MobilePhone}
    </div>

</aura:component>
Make sure you prefix the controller name with your own namespace you created in module 2.
<a href="{! '#contact/' + contact.Id }"> anchor tag that sets the page hashtag to #contact/ followed by the contact id of the clicked contact. In this component, the locationChange handler is defined to listen to hashtag changes, and execute the controller's locationChange() when it happens. The locationChange() function implemented in the next step retrieves and displays the selected contact.Click File > Save to save the file
Click CONTROLLER (upper right corner in the code editor)
Implement the Controller as follows:
({
    locationChange : function(component, event, helper) {
        var token = event.getParam("token");
        if (token.indexOf('contact/') === 0) {
            var contactId = token.substr(token.indexOf('/') + 1);
            var action = component.get("c.findById");
            action.setParams({
              "contactId": contactId
            });
            action.setCallback(this, function(a) {
                component.set("v.contact", a.getReturnValue());
            });
            $A.enqueueAction(action);
        }
    }
})
Click File > Save to save the file
Click STYLE (upper right corner in the code editor)
Add the following styles
.THIS p {
    margin: 20px 0 2px 0;
}

.THIS h1 {
    margin: 0 0 10px 0;
}

.THIS h3 {
    margin: 4px 0;
}
Click File > Save to save the file
In the Developer Console, go back to the QuickContacts application and modify the container layout as follows to add the ContactDetails component to the right of the list (change the class of the first column to col-sm-4 instead of col-sm-12, and add a second column to display ContactDetails):
<div class="container">
    <div class="row">
        <div class="col-sm-4">
            <yournamespace:SearchBar/>
            <yournamespace:ContactList/>
        </div>
        <div class="col-sm-8">
            <yournamespace:ContactDetails/>
        </div>
    </div>
</div>
Make sure you prefix SearchBar, ContactList, and ContactDetails with your own namespace you created in module 2.
Click File > Save to save the file
Click Update Preview to run the application in the browser